Easy to Mount Piano Microphone Perfect for Upright or Grand
-
The Best Piano Microphone
-
How to Mic an Upright Piano and How to Mic a Grand Piano
- Mic Piano in 5 steps
- Clean
- Remove adhesive
- Piano Mic placement on Soundboard
- Secure wire
- Connect to Rolls Stereo Mini-Mix
-
Barcus-Berry Planar Wave (Piano Mic)
-
Rolls Stereo Mini-Mix VI (Piano Mixer)
-
How-To
Disclosure: Some of the links in this article may be affiliate links, which can provide compensation to me at no cost to you if you decide to purchase.
The Best Piano Microphone
As a piano tuner I recently installed this Barcus-Berry Planar Wave microphone & Rolls Stereo Mini-Mix on the soundboard of an upright piano for piano performances. It's a great microphone also compatible for grand piano.
The Barcus Berry piano pickup mic and mixer is recommended for a balanced sound, best value, and the best results.
The installation was surprisingly easy and took less than 20 minutes to setup this single microphone for acoustic piano.
Rather than worry about placement, the transducer microphone will pickup transverse waves traveling in the soundboard's plane. This provides full-spectrum frequency response, noise reduction, and perfect amplitude balance across the entire instrument.
It has no feedback problems or bleed from ambient sounds. In fact, it's encouraged to leave the lid open on grand pianos for the best piano sound experience. Even the best microphones must compensate for sound quality with high-pass filters in a live performance setting.
How to Mic an Upright Piano and How to Mic a Grand Piano
Mic Piano in 5 steps
Clean
It's a good idea to clean/wipe down the area where the transducer microphone can best be placed. The last thing you want is for a buzz to occur or the mic to come loose.
Remove adhesive
Remove the adhesive tape while keeping the sticky area free of dust or blemishes for good results. The sound source is important to keep clean.
Piano Mic placement on Soundboard
Gently, but firmly adhere the Planar Wave Mic to the sweet spot of the soundboard. In the manual, placement is technically recommended around middle C.
Going through the sound holes of the piano plate is also acceptable. Microphone placement isn't very crucial because the Planar Wave mic captures transverse waves directly traveling through the soundboard.

How to Mic a Piano
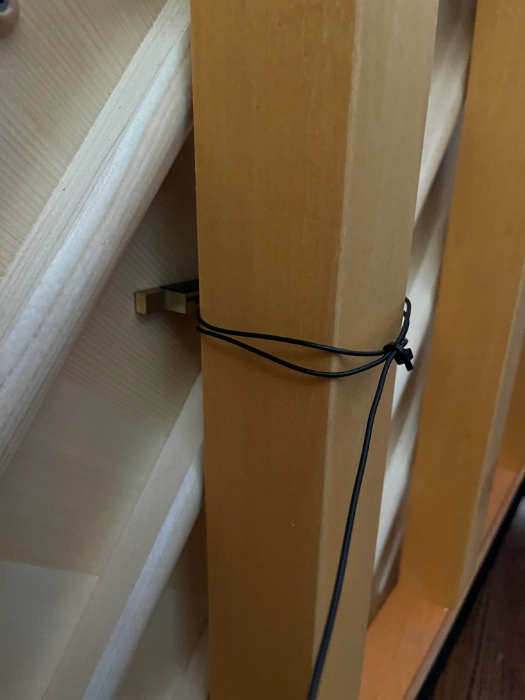
Secure wire
Secure the wire so that it can't be tripped or yanked. Each time the sensor is removed, a new adhesive must be applied.
The kit comes with an extra few adhesives in case the microphone should be moved or placed on a different piano.
Connect to Rolls Stereo Mini-Mix
It's recommended that the transducer mic should connect to a mixer like the Rolls Stereo Mini-Mix VI to balance sound.

The Rolls Stereo Mini-Mix VI must be purchased in addition to the Barcus-Berry Planar Wave piano mic.
Finished!
Piano Care
Best Piano Room Humidifier For Humidity Control
Best Hygrometer To Monitor Relative Humidity Temp For Pianos
Piano Gifts
Best Piano Foot Pedal Extender For Kids Technician Review
Adjustable Hydrualic Piano Bench Review
Piano Dust Covers For Upright And Grand Piano Keyboard Dust
...Continue reading about the Barcus-Berry Pickup Mic and Rolls Mini-Mix below!...
Barcus-Berry Planar Wave (Piano Mic)

Planar Wave Piezo Transducer with preamp for acoustic piano & harp
This microphone is an excellent choice and ranks #2 on the Best Piano Gift Ideas for Pianists and Piano Lovers of 2024
Installation instructions for Acoustic Piano & Harp Model no. 4000 by Barcus-Berry, "True Expression."

Here, I've typed out the official instructions so that it's easier to read online.

"Congratulations on your purchase of the Barcus-Berry Planar Wave System
The Planar Wave Piano and Harp System represents a significant breakthrough in transducer technology. The sensor employed is essentially non-responsive to those vibrations which are normal to the major surface planes of the instruments soundboard. It is, however, highly sensitive to transverse energy waves traveling in the plane defined by the soundboard and is thus able to provide full-spectrum frequency response and perfect amplitude balance across the entire instrument while achieving an excellent degree of isolation from ambient sounds together with outstanding feedback rejection. The system can be quickly and easily installed on any piano or harp and can be just as simply removed without leaving any visible evidence of its use. No tools are required for installation.
Important
Before you begin, please check within the box to ensure that it contains the following items:
One Barcus-Berry Planar Wave Sensor.
One Barcus-Berry Piezo Buffer Preamp.
Adhesive patches for transducer installation.
One set of rubber feet (four each).
Installation Instructions for Model 4000.
If any of these items are found to be damaged or missing, immediately contact the Barcus-Berry dealer from whom the unit was purchased.
Installation
For a piano, the transducer should be attached to the soundboard as indicated in Figure 1 for grand pianos and Figure 2 for uprights. For harps, the transducer should be attached to the face of the soundboard, for convenience, preferably near the base. To assure proper bonding of the transducer mounting adhesive, it is strongly recommended that the area selected for attachment of the transducer be cleaned to remove any surface dust or oily film which may have accumulated.

When you are ready to make the installation:
Remove the protective paper covering from each foot of the transducer to expose the adhesive film applied at the factory. Select the location desired for attachment, then firmly press both feet of the sensor onto the soundboard, normally around the middle C note.
Position the preamp near the keyboard at any convenient location within reach of the transducer cable and plug the transducer into the input jack on the rear panel.
Connect the Hi-Z and/or Lo-Z output of preamp to any appropriate amplifier or console input.
Move the power switch on the front panel of the preamp to the "ON" position and the system will be operational.
Special notes on installation and removal...
The pressure-sensitive material used for attaching the transducer feet to the soundboard is a special, high-performance adhesive. This adhesive must be replaced each time the transducer is removed. An initial supply of pre-cut adhesive patches is furnished with this system.
Caution: Do not attempt to employ alternative methods for attaching the transducer. The means of attachment specified above is critical for achieving optimized performance with this system.
Additional adhesives are available. To order, please contact the Barcus-Berry dealer from whom the unit was purchased.
When removing the transducer, simply apply sidewise pressure to the crossbar section above each leg until the feet of the sensor detach from the soundboard. Any adhesive residue which may remain on the soundboard and/or on the feet of the transducer after detachment can be quickly removed by simply rubbing the surface with your thumb or fingers.
Important: When using this system with a grand piano, we strongly recommend that the lid of the piano be raised while the system is in use. Even with the lid open at full stick, there will be no feedback problems or bleed from ambient sounds, and the performance of the Planar Wave Piano System will be enhanced by having the lid up.
This pickup can operate on phantom power provided by a mixing board or on a 9-volt batter. To replace the 9-volt battery in the preamp, remove the screws which secure the cover at each end of the unit and slide the cover away from the chassis. This will permit easy access to the battery. Under average conditions or use, battery life expectancy is at least 1,000 hours.

Specifications for the 4000 Piezo Buffer Preamp
Input Interface = 1/4" Unbalanced
Input Impedance = 2.2 Meg Ohms
Maximum Input Level = 2. vrms
Monitor Output
Output Interface = 1/4" Unbalanced
Output Impedance = 2K Ohms
TDH = .005% @ 1kHz
Noise = -102dBu
S/N = 110dBu
Frequency Response = 5Hz - 30kHz (+/-1dB)
Main Output (0dB Setting)
Output Interface = XLR Balanced
Output Impedance = 1K Ohms
THD = .005% @ 1kHz
Noise = -105dBu
S/N = 108dB
Frequency Response = 5Hz - 30kHz (+/-1dB)
Power Supply
48V Phantom Power: Pin #2 is Hot
Power Source = 9 Volts @ 380 Microamps
Battery Life = Approzimately 1,000 hours
Made In The U.S.A.
This Barcus-Berry product is designed to satisfy the most rigorous demands of the professional musician and the precision manufacturing techniques employed provide assurance of long continued, trouble-free service. For outstanding performance and dependability, you can always rely upon BARCUS-BERRY - the world's leading name in musical instrument transducers, pickups and microphones.
Limited Warranty
This Barcus-Berry product is warranted for a period of one (1) year from the date of purchase against defects in workmanship and parts.
Caution: Avoid placing strain on the output cable when removing the transducer; any damge which this shielded wire may sustain from undue rough handling will invalidate the product warranty."


Rolls Stereo Mini-Mix VI (Piano Mixer)
It's recommended to connect the Rolls Stereo Mini-Mix VI to the Barcus-Berry Planar Wave Piano Microphone.
This way a greater degree of balance can be achieved through the output of the signal.
How-To
How To Connect Yamaha Disklavier Piano To Sonos Audio System And App
How To Connect Disklavier To Alexa Using MusicCast
Quick Yamaha Disklavier DKC-900 Upgrade Manual Guide
How To Setup Yamaha Disklavier TV
How To Instructions For Dampp Chaser Pads Replacement
How To Prepare A Class At The Piano Technicians Guild Annual Convention
Verituner Quick Start Guide In Minutes For New Users
Make The Best String Jig For Piano Tuning
Piano Care
Best Piano Room Humidifier For Humidity Control
Best Hygrometer To Monitor Relative Humidity Temp For Pianos
How To Instructions For Dampp Chaser Pads Replacement
Therm Pro Vs. Secrui: Which Hygrometer is more accurate?
Piano Gifts
Best Piano Foot Pedal Extender For Kids Technician Review
Adjustable Hydrualic Piano Bench Review
21 Useful Gift Ideas for Pianists And Piano Lovers In 2024
Easy To Mount Piano Microphone Perfect Mic For Upright Or Grand
-
The Best Piano Microphone
-
How to Mic an Upright Piano and How to Mic a Grand Piano
- Mic Piano in 5 steps
- Clean
- Remove adhesive
- Piano Mic placement on Soundboard
- Secure wire
- Connect to Rolls Stereo Mini-Mix
-
Barcus-Berry Planar Wave (Piano Mic)
-
Rolls Stereo Mini-Mix VI (Piano Mixer)
-
How-To
Disclosure: Some of the links in this article may be affiliate links, which can provide compensation to me at no cost to you if you decide to purchase.