Verituner Quick-Start Guide for New Users

-
Verituner Quick-Start Guide
-
Measuring Inharmonicity with Verituner (Sound of the Strings)
-
Fine Vs. Course Tunings
-
Why is the Verituner reading the incorrect note?
-
How should I use overpull on Verituner?
-
Best Piano Tuner Books
Verituner Quick-Start Guide
For additional information, please see the Verituner User Guide for Apple iOS devices.
GET STARTED in MINUTES with this brief guide I created below! It's the least amount of information you need to get started NOW!
When you open the app it should say “Start, Load, Resume.”
You’ll likely only need to use the “Start” button, unless you've previously created a tuning file.
If you have no idea what a tuning file is, don't worry! Simply press "start" to begin.
If you do have a tuning file saved, press "resume" or "load" if you had just been working on a tuning you've saved.
After pressing start, see that a few settings are correctly configured.
Hertz is set to 440 (or another pitch if you'd prefer)
Style is set to “Average”
Temperament “equal.” (This is the tuning that most pianists are pleased with).
To exit, Press “Done.”
Measuring Inharmonicity with Verituner (Sound of the Strings)
Now, play note A3 until the “I” icon on the right hand side fills from the bottom with blue shading. Please wait until the "I" is fully shaded so that the computer can correctly measure the frequencies of the string.
If you haven't tried it yet... Hold down key A3 on the piano for a few seconds and you'll see what I mean.
Do the same now for note A4 on the piano.
The software must record the sound of the strings in this manner to produce the best results.
Once the "I" (Inharmonicity) icon has filled up, you may begin tuning the piano.
Best practice: Play around with filling up the “I” icon on other notes if you think that the inharmonicity on that piano is particularly unique.
Fine Vs. Course Tunings
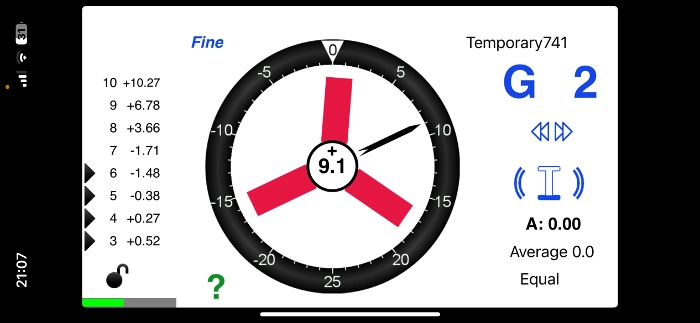
The Electronic Tuning Aid has two different displays depending on whether the tuner is doing a "fine" tuning or a "coarse" tuning.
Fine Tuning - Concert level tuning. This is performed only after the piano is already close to concert pitch and the piano demands extreme accuracy and uncompromising musicality.
Coarse Tuning - Also associated with "pitch corrections," or especially when the piano will need an additional tuning relatively soon after the first tuning.
The screen above shows the red triangular spinner that indicates whether the note is sharp or flat.
The display appears more sensitive because the spinner will move faster the worse the note is out of tune etc.
In a coarse tuning, such a sensitive display isn't necessary.
The screen above is what I choose to use for when I use Verituner.
The single needle indicates where the pitch is reading from the device.
I find that it's possible to achieve concert level tuning with this display, though some may prefer the screen that appears more sensitive.
Why is the Verituner reading the incorrect note?
If the Verituner isn’t reading the correct note, tap on the alphabetical letter indicator with your finger and/or swipe up and down to change the note chromatically.
If the Verituner is on the incorrect octave, swipe up or down on the number to change the octave.
How should I use overpull on Verituner?
Overpull - This is when a piano tuner pulls the pitch of the strings higher than where the final pitch should settle.
On the left hand side, you will see that there is a percentage number. If you tap on it, it will read 0%, 10%, 28%, 36%, etc.
The percentages represent the amount of "overpull."
The bass section is best set at 10%
28% for the tenor
36% for the midrange (though I would use your own judgement)
Below you can see that overpull settings were adjusted to:
0%
28%
36%
I don’t believe that the overpull settings are perfect on their own without being modified. If this gets confusing, it's better to focus on being as accurate as possible and performing two full passes across the piano, in addition to a final "touch-up" pass.
Most of the time, I’ll use my senses to feel the torque of the piano tuning pins with my tuning lever to determine how much to overpull. This is instead of tuning precisely to the overpull recommendation.
Extra:
I no longer use Verituner to tune pianos. In fact, I’ve found that PianoScope is more user friendly.
I believe that Verituner and PianoScope are technically very similar, though both have unique features, it just takes extra effort to get the most out of Verituner.
Best Piano Tuner Books
Piano Servicing Tuning Rebuilding By Arthur A Reblitz Book Review
Pianos Inside Out By Mario Igrec Review
Top 3 Piano Tuning Books For New Piano Technicians And Tuners
Piano Tuning A Simple And Accurate Method J Cree Fischer Technician Book Review
Technician Gear, Tools, Machinery
Best SwissGear Work Backpack Tool Bag Review
Nova Voyager DVR Dril Press Review By A Piano Technician
Best Roll Up Screwdriver Set PB Swiss Tools
Best Piano Service Supplies For Hybrid And Electronic Repair
Best Tools To Use For The Piano Life Saver Dampp Chaser System
-
Verituner Quick-Start Guide
-
Measuring Inharmonicity with Verituner (Sound of the Strings)
-
Fine Vs. Course Tunings
-
Why is the Verituner reading the incorrect note?
-
How should I use overpull on Verituner?
-
Best Piano Tuner Books


