DKC-900 Upgrade Kit Guide: Yamaha Disklavier Player Piano
-
Reminders of installing DKC-900 Upgrade Kit
- Material Must-Haves (Not included in the DKC-900 Upgrade kit!)
- Important things to NEVER skip BEFORE installation
- Best Practices
-
How do I reach Yamaha Piano Technician Support?
-
Start: DKC-900 Installation (2-3 hours)
- Backup of Data
- Operation Check
- Removal of parts (KEEP power supply unit)
- Wiring work
- Power Up
- Firmware Update: Version 5.21.01 and Calibration
- Tutorial of DKC-900 Features
Reminders of installing DKC-900 Upgrade Kit
I've installed dozens of DKC-900's, here are some refreshers for whenever you install a DKC-900 Unit. The installation process takes 2 hours, plus, allow for 1 hour to demonstrate to the customer how it all works.
Remember, the DKC-900 lets customers have intuitive access to Yamaha piano radio services (Disklavier Radio) and other premium piano performances through DisklavierTV, On-Demand, Smart keys feature (scroll to the bottom of built-in songs), and Music Shop purchases.
Upgrades are ONLY possible with an existing Mark IV (DMC100, PRC100) or E3 (DKC-800) player system. Older systems like the Mark III Yamaha Disklavier Pianos cannot be upgraded (unless you are willing to find a DKC-800 or DKC-850, which are no longer produced).
*It's important to access the official Yamaha DKC-900 Installation Manual for all electrical safety methods, protection for the piano & technician, and thorough details to properly install this Yamaha product.
The intended use of this information is for quick-reference purposes.*
Material Must-Haves (Not included in the DKC-900 Upgrade kit!)
Usb Thumb Drive (Necessary to upgrade to version 5.21.01 once installed)
Customer-owned Usb Thumb Drive/Hard Drive (To extract all customer music/files from current system)
Extra screws, clips, fasteners (for wires/cabling)
Access to Yamaha's DKC-900 Installation Manual
Overview: Web page of DKC-900 Product Features
Important things to NEVER skip BEFORE installation
Check that it turns on, plays notes AND pedals function
Check that the audio backing of the silent system works when playing the keys of the piano in silent mode
Check that the speakers/background music works
Check for obvious damage to the piano and bring to the customers attention before beginning work (if any)
*Make careful note of ALL 4 observations. Failure to do so may be time costly, plus, it is the technician who is responsible for the correct information.
Best Practices
ALWAYS leave property (old Mark IV or E3) with owner even if they insist you'd be better to take it. (cite "policy" if they want you to take it)
Setup internet/wireless network connectivity (May require their IT specialist if network is high security; uncommon)
Attempt to connect to Sonos (How to Connect Yamaha Disklavier Piano to Sonos Audio System)
Learn to Sign-up a customer for a Disklavier Radio subscription
Ask whether they would like to setup Disklavier TV at a future time
Demonstrate headphone connectivity is still available for Quiet Mode
Demonstrate a tutorial of the "streamlined control panel" through the App on one of the customers’ mobile devices
Exit the appointment with cardboard and plastic recycling/waste to dispose of on your own
How do I reach Yamaha Piano Technician Support?
Phone support
(714) 522-9000 (Option 4)
Monday - Thursday
9:00am - 12:00 pm & 1:00pm - 5:00pm (PST)
Friday
9:00am - 5:00pm & 1:00pm - 4:00pm (PST)
Better yet, start a "case" quickly and efficiently by filling out a "Web Form": How to contact Piano Service for Disklavier Support

Before you start...
Opening the manual
The official DKC-900 installation manual is separated into 3 sections and it will save confusion to know whether you are upgrading from an E3 or a Mark IV to begin with. As well as whether or not it's an upright/grand, you should call a technician if you can't tell the difference!
Sections of the Installation Manual
From a Grand Piano (GP) with an "E3"
From a Grand Piano (GP) with a "Mark IV"
From an Upright Piano (UP) with an "E3"
For the sake of demonstration I will be discussing the 2nd option upgrade from a Grand Piano (GP) with a “Mark IV.”
Start: DKC-900 Installation (2-3 hours)
Backup of Data
Generally, customers who have upgraded to a DKC-900 know enough to have prepared backups of their own music before the technician arrives.
The only thing that's necessary of you is that you ask whether the customer has properly backed up the data BEFORE you arrive.
This will save time and allow you to be properly prepared for the appointment.
*If the customer has not backed up the data and needs help, it is best to reference this process in the installation manual and come equipped with the necessary USB flash memory with sufficient storage to successfully offload the music. Test the success of this step by accessing the music from a laptop with the USB inserted.
Operation Check
To repeat what was highlighted above, it is crucial to run through these steps to avoid the consequences of improper installation, innocent mistakes, and/or lack of due diligence.
Check that it turns on, plays notes AND pedals function
Check that the audio playback of the silent system works when playing the keys of the piano in silent mode
Check that the speakers/background music works
Check that the recording function works
*Again, make careful note of ALL 4 observations. Failure to do so may be time costly, plus, it is the technician who is responsible for the correct information!
Checking the floppy disk drive, silent piano portion, power supply unit, the playback system, and audio connectivity are all part of the regular procedure for installing DKC-900 systems.
Removal of parts (KEEP power supply unit)

Parts:
I/O Center Removal or Unplugged; remove all cables connected to this unit.
Removal of the Media Center/control unit; remove all cables connected to this unit.

Common Cables:
Remove old RCA cables that plug in to speakers
Remove old S/P-DIF cables (blue & green)
Remove old D-sub cable (thickest cable)
Reuse LAN (internet) cable
Many cables attached to additional musical hardware equipment/accessories that are not native Yamaha products may be referenced extensively in the Installation Manual.
The power cable can be clipped into place ("fixed") to the side of the rim, so full removal is not necessary.
*Are you in Europe? If so, you may need to use a pre-existing D-sub cable that attaches to the "option" on the CC-unit:
"The way to tell is to quickly drop down the E3 PSU and look for the white ERP sticker. If you find one then you MUST use the original 15 pin cable and attach it to the 'OPTION' port on the 900 I/O box. The system will not work without this second cable connected. This will NEVER occur on a MK4 because by definition they are too old for ERP. Also, in the USA you will never encounter the issue. It's only in Europe."
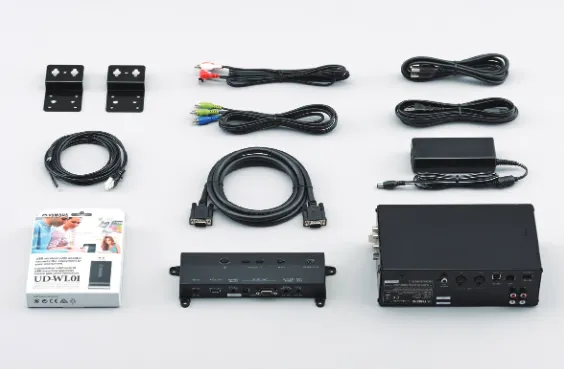
Installation of New Parts
New Switch Box (left side of the keyboard)
CC Unit (Control Center Unit)
Plug in UD-WL01 to rear of Switch Box

Attach mounts to unit
Please be sure that the parts are installed in correct position in the example below for an elegant look. Also note that 392mm is roughly where the CC Unit belongs from the bass side of the piano, use common sense to fit in optimal position. (Roughly behind the Trapwork).


Wiring work
New RCA cables for Speakers (and Sarah McLachlan vocals ;)
D-sub Cable (Switch box to CC Unit)
S/P-DIF (Green & Blue Cables) - attach/reuse old "Ferrite core" to CSP side
DC Cable (Power Cable for CC Unit)
USB cable (Switch Box to CC Unit)
Earth Cable (Grounded to screws)

Power Up
Be sure UDWL-01 is inserted to the rear of the switch box
Turn on Power supply after plugging-in
Connect DC power adapter to outlet
Power on Switch Box
Powering up in this order is for best practices purposes.
Firmware Update: Version 5.21.01 and Calibration
Currently, the Version 5.21.01 firmware may be installed “over the air” after connecting the DKC-900 to the internet.
This is why it is crucial to have a USB device with the 5.21.01 firmware version readily available. (Password distributed to authorized technicians only; contact Yamaha for access).


Lastly, be sure to calibrate the piano and troubleshoot any errors that appear during calibration.
A few things to check are:
Excess friction
Sluggish solenoids
Dirty greyscales
Proper model setting
Misfiring solenoid (rare; replace key drive board)
Tutorial of DKC-900 Features
*Make sure everything you are about to show the customer works on the Enspire Controller App BEFORE you call them over!*
Built-in songs with piano songs, pop songs and vocal performance
How to record and playback on acoustic piano
Disklavier TV (Okay to setup on another visit if you don't have time or customer isn't immediately interested)
Disklavier Radio: Attempt to have them sign up with your help (They must create an account first, before they can pay for the subscription)
How to navigate the online store at Yamaha Musicsoft through the “Music Shop” tab if they are interested in purchasing additional music
Show them "Smart Key" feature (Only if they have the Enspire Pro)
How to press Play/Pause, Volume control, and power on/off on the switchbox for simple tactile control.
Be sure that the customer knows that should they subscribe to Disklavier Radio, they can listen to the piano music of top artists with their own performances on channels of 24-hour "Piano Radio" stations.
The actual artists have instrument exclusive content on the piano, now through the seamless compatibility of their favorite mobile device!
Final Remarks
This guide should act as a "refresher" so that we don't miss anything during routine installations and that we avoid the most frequent and sometimes silly mistakes that warrant a call-back.
The “Brief Refreshers” and “8-Step Installation Guide” should help customers have a consistent experience with their new DKC-900's and give peace of mind to the technician in preparation for installing this Yamaha product.
Related Articles:
3 Best Ways To Connect Yamaha Disklavier Piano To The Internet
How To Setup Disklavier TV with a Yamaha Enspire in 3 Phases
-
Reminders of installing DKC-900 Upgrade Kit
- Material Must-Haves (Not included in the DKC-900 Upgrade kit!)
- Important things to NEVER skip BEFORE installation
- Best Practices
-
How do I reach Yamaha Piano Technician Support?
-
Start: DKC-900 Installation (2-3 hours)
- Backup of Data
- Operation Check
- Removal of parts (KEEP power supply unit)
- Wiring work
- Power Up
- Firmware Update: Version 5.21.01 and Calibration
- Tutorial of DKC-900 Features