How to Update Firmware for Yamaha Disklavier E3 / DKC-850
To establish an internet connection, a firmware update is needed to continue using the internet features for the E3(DKC-800)/DKC-850 version of Disklavier. This is required especially if it hasn't had the latest version firmware installed.
For this Yamaha Disklavier Piano, use the control unit to update to the latest firmware and restore the use of the internet again for use of Yamaha Disklavier Radio.
It's not necessary to have a serviceman from an Authorized Yamaha Dealer in the United States to schedule an appointment to update a Disklavier. With a Tech-Savvy mindset, it's simple to update your piano and I'll show how to perform this piece of piano maintenance (ios devices not needed).
The first time I updated the software for this system it was intimidating, however, these instructions I created with Noah Jolly make it simpler.
As you may already know about Yamaha pianos, the Mark III upgrades to the DKC-850; whereas the Yamaha Mark IV upgrades to a DKC900 piano model, and does not need this particular update.
How to update software for Yamaha DKC-850 / E3?
Materials
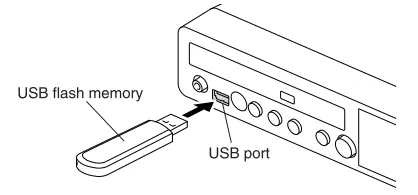
USB Flash memory no larger than 64GB and formatted in FAT32.
You will need to:
Download the "dkv_update.bin" file on the Yamaha website
Move it onto an otherwise blank USB thumb drive
Properly eject the USB flash drive from the USB port
Software Update Instructions for an E3 (DKC-800)/DKC-850 pianos
1. ENSURE that the update program is properly prepared on the USB flash drive.
2. HOLD [Play/Pause] on the control unit and PRESS [On/Off] power button to turn the system on.

The current software version of each module appears one after the other.
3. PRESS [Enter] on the control unit to continue.
The screen below appears.

4. PRESS [Enter] on the control unit again.
After a while, the update confirmation message will appear for each of the 4 modules in a row.
5. PRESS [Play/Pause] to start the update of the 1st module (3 minute duration).

While waiting, you will see the message below.

Once complete, the confirmation message for the 2nd module appears.
6. PRESS [Play/Pause] to start the update of the 2nd module (3 minute duration).

Once complete, the confirmation message for the 3rd module appears.
7. PRESS [Play/Pause] to start the update of the 3rd module (2 minute duration).

Once complete, the confirmation message for the 4th module appears.
8. PRESS [Play/Pause] to start the update of the 4th module (2 minute duration).

The closing screen appears when the update for all 4 modules are complete.

9. RESTART the Disklavier
10. Finish!
Credits: Noah Jolly, a Yamaha Corporation of America Trained Technician, helped me create this simple guide for updating the software on an E3(DKC-800) and DKC-850 in order to use internet features like Disklavier Radio. He provides professional repair for a wide variety of analog and digital audio equipment in New York City. Reach him at his website for his extensive expertise and technical support GroundGrownCircuits.com
Related:
Quick Login: Yamaha Disklavier Radio on E3/DKC-850 Pianos
How to Setup Disklavier TV with a Yamaha Enspire in 3 Phases
3 Best Ways to Connect a Yamaha Disklavier Piano to the Internet
Yamaha Egnyte Login: Service and Owners Manual/Guides
Quick Yamaha Disklavier DKC-900 Upgrade Manual Guide
How-To
How To Connect Yamaha Disklavier Piano To Sonos Audio System And App
How To Connect Disklavier To Alexa Using MusicCast
Quick Yamaha Disklavier DKC-900 Upgrade Manual Guide
How To Setup Yamaha Disklavier TV
How To Instructions For Dampp Chaser Pads Replacement
How To Prepare A Class At The Piano Technicians Guild Annual Convention