How to Configure TP-Link N300 Wireless Nano Router
Disclosure: Some of the links in this article may be affiliate links, which can provide compensation to me at no cost to you if you decide to purchase.
Here's the steps to setup the TP-Link N300 wireless Nano Router that's the perfect choice for connecting devices like player pianos, online gaming, and other client Wi-Fi devices.
Written instructions for 'Client Mode' (which is the proper setting) setup are available in the paper manual of your product, which works for most networks in customer’s homes.
Step 1: Plug-in the Nano Router and ethernet cable

The N300 Nano Router is mounted to the beam. I've wrapped the ethernet cable very tightly to keep it condensed and orderly.

The Nano Router is powered by an additional extension cord that I installed because the power supply of the Piano itself does not always have enough AC outlets for the Router to plug into.
Step 2: Reset the TP-Link N300 Wireless Portable Nano Travel Router
After plugging everything in, press the "reset button" on the router.
I do this by pressing the "reset button" with a capstan tool (pokey tool or paper clip).

Resetting is something you need to do if you...
Entered the incorrect password
Connection has not been established
Wi-Fi password changed
Connect to a new network
Step 3: Connect to TP-Link Wi-Fi network and enter 8 digit Password
In your iPhone settings, go to Wi-Fi, look for a WiFi network that starts with "TP-Link".

Then, enter the 8 digit passcode underneath the second bar code at the lower right hand side on the back of the square box.

The passcode for the TP-Link network (found in WiFi settings) for the device in this picture reads "60148186."
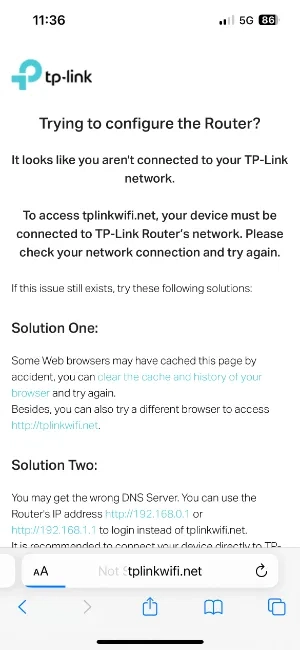
Step 4. Launch http://tplinkwifi.net in your web browser
Choose from Google Chrome, Firefox, or Safari etc. and launch a new tab and enter "http://tplinkwifi.net" into the URL.
*Create a new password to log in.
Step 4: Software configuration of the TP-Link N300 Wireless Portable Nano Travel Router
Enter in any password
Do not get carried away with passwords because whenever the device is "reset" then it will always ask you to create a new password. I have never had to enter the password to get back into the system. I reset them all the time!

I always click "Use Strong Password" because it's quick & easy.

Continue with Quick setup by pressing "next."

Select "Client" Mode to properly configure the TP-Link

"Connect" to the strongest network you know the password to.
This screen will show you all available networks that the router can join.
It is ranked by strongest network at the top and least strongest networks at the bottom.
Choose your strongest network.

Enter in the password of that WiFi network and click "next."
*If you selected your regular home wifi, this would be the password you share with family and guests to login to the network.

Press "next" (for default settings), unless you need to enter in a unique static IP address that is generally only needed for higher security networks.
*If you believe the network is a bit more complicated and after already trying the instruction instructions below, please reference - Static IP: How Best to Setup TP Link (Or contact the "IT Guy").
...9 times out of 10, pressing the "next" button will do.

Press "finish" so that the system can reboot, which may take a few minutes.

Make sure to wait until the bar loads 100% so that it reboots properly.

Once you see this screen, exit out of the browser tab and get back on your preferred home network/the network you connected to the piano.
Finally, test your client device to see whether it has been connected to the internet!
Step 5: Power cycle the Client Device (If needed)
Powercyle the Client device so that it may be able to properly receive the internet signal from the Nano router.
After about 15 seconds, turn it back on and you should be connected to the internet.
If that doesn't work, then you may need to configure a static IP address in the router settings so that home network does not see the Piano N300 Nano Router as a "Rogue AP." Contact the "IT guy" if there is one.
The Device is now all connected to the internet!
The above steps are all you should need to connect this device.

Here is my stash of N300 Nano Routers that I like to keep in my car.
If there is ever a Nano Router that doesn't work, I always have a couple backups.
Occasionally, there will be a customer who needs help connecting their piano to the internet who has a different router of a different brand underneath the piano. In a situation like this, I will use my preferred router because I know it's reliable and easy to setup. Routers aren't complex once you learn about how to set up.
However, if I were to learn about every new router that I encounter in the field, it would add significant time to my service visits. So, I prefer to bring my own routers.
Not working?
If you have successfully completed these steps and still cannot connect to the internet (Green light on TP-Link is solid green), you may need to connect to a Static IP Address. Learn how ==> Static IP: How Best to Setup TP-Link with Yamaha Disklavier
Wi-Fi routers for Player Piano Systems

TP-Link Powerline Vs. Vonets: What's the Difference?
Vonets VAP11AC Wireless Wifi Router Customer Review
How to Configure TP-Link N300 Wireless Nano Router
TP-Link TL-WR802n Nano Router Customer Review
TP-Link Powerline AV1000 Adapter Customer Review
Tp-Link Nano Router vs. Vonets: What's the difference?
Static IP: How Best to Setup TP Link with Yamaha Disklavier
Yamaha Disklavier: 3 Best Routers to Connect Internet Wi-fi
Disclosure: Some of the links in this article may be affiliate links, which can provide compensation to me at no cost to you if you decide to purchase.