Best SwissGear Work Backpack: Tool Bag Review
Disclosure: Some of the links in this article may be affiliate links, which can provide compensation to me at no cost to you if you decide to purchase.
I've used this SwissGear work backpack for a few years as a piano tuner based off of a recommendation from a colleague. I must say that I've been pleased working with it through storing tools, gadgets, and laptops.
This is the best work backpack I've reviewed, especially considering how I use it as a piano technician.
Best Swiss Gear Backpack
In fact, it's the same exact backpack that I owned previously. (This was my second order).
The only reason I got a new one (same backpack) was because the main zipper failed after putting it through heavy zipping on a daily-basis. I was a little rough with the zipper, but now I know not to force it and so I think it will last a lot longer.
I like it because it has the modernity of a backpack with the portability of a toolbox.
Other than that, It felt nice to get a backpack refresh even though my previous backpack of the same kind had little/minimal signs of wear & tear.
Should you buy the SwissGear Backpack for Tools?
Buy if
You want a backpack with straps, handles, buckles and a variety of compartment sizes and styles
You want a backpack that can store a laptop, battery packs, and pieces of paper
You want a backpack with an abundance of pockets, pouches, and a hardened base
You have a lot of oddly shaped objects to fit in the backpack
Don't buy if
You need to carry more than 40lbs of tools
You need a waterproof backpack
You need a backpack that's only school related (books, papers, pencils, binders)

3636 Work Pack Pro
SwissGear Backpack for Tools Pros and Cons
Pros
Fit lots of oddly shaped items
Great when the total weight is 30lbs or less
Sunglasses compartment
Laptop safe storage
Buckles expand or contract the size
Cons
If it gets too heavy, you'll want to find a storage alternative with wheels
Zipper may give out with repeated abuse/heavy use
Difficult to stand itself on its own

See SwissGear Backpack in Black
See SwissGear Backpack in Black & Brown
See SwissGear Backpack in Brown Canvas
^^^See the latest prices^^^
SwissGear Tool Bag Backpack Price
At the time of this writing this backpack only costs $99.99 on Amazon!
It's currently discounted from its original $149.99 price tag. It's also possible to purchase this backpack on Amazon with financing for $20/month until its paid in full.
SwissGear Tool Backpack Features
Side Pockets
The side pockets are convenient for stuffing a tool roll like this Swiss Tools Roll that I use for just about every job.
It's also convenient because I frequently keep used tools in the back pouch for easy access.
Rear Pouch
In the pouch at the rear of the backpack, I store my Klein bags. These bags are filled with loose tools that otherwise don't have a great place to store in the backpack.
The bags are easily grab-able due to the zipper straps as well as the overall location of the bags.

3636 Work Pack Pro
Buckle Pouch for Tool Bags
Whenever I'm removing one of the bags, I unbuckle the strap so that it's easy to remove or replace each bag with regular use.

Side Pockets
The left pouch is just large enough to hold another Klein tool bag. These heavy-duty bags were adopted from my previous tool bag setup because they've lasted over 6 years and just work!
Oddly enough, using the side pockets of this backpack like this has been the best use that I've come up with so far.

3636 Work Pack Pro
Zipper Compartments
This zipped compartment is large enough for one of my favorite leather tool rolls.
It's an easy way to stash some extra tools that also can't be placed on its own within the backpack.
Don't worry, we'll get to tools that can actually be placed inside the backpack in an organized fashion.

3636 Work Pack Pro
Top pouch
This top small pouch was meant for glasses due to the hard lining of the internal recess. So, keep in mind that it's available for use with glasses.
I've found this hard-shell pocket best for accessing small items that I need quickly, like business cards, flashlights, and other small tools.

3636 Work Pack Pro
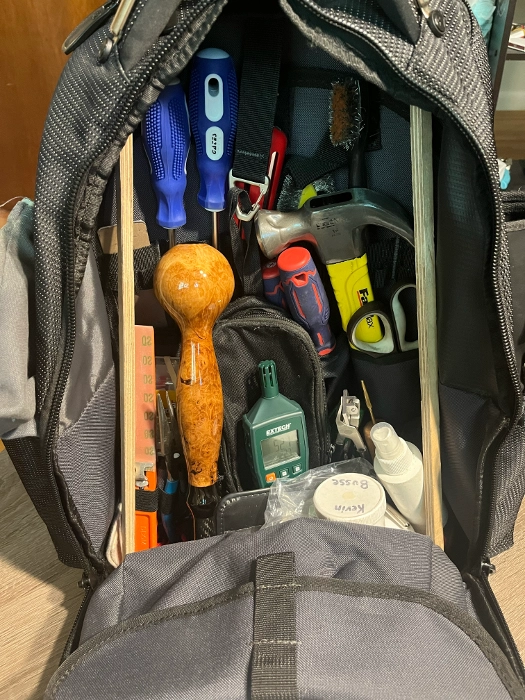
Hard Bottom Backpack (Main Compartment)
Here's the ample main compartment where you can see some hand tools and work tools.
Some tools fit naturally into the provided straps while others don't! So, you have to be creative and take time to sort them out properly!
Show off your fully-loaded tool bag by leaving the back open on display throughout the appointment. It's a great way for your tools to get some air-time after all of your tool purchases!
See SwissGear Backpack in Black
See SwissGear Backpack in Black & Brown
See SwissGear Backpack in Brown Canvas
^^^See the latest prices^^^

3636 Work Pack Pro
Main compartment (Left Side)
The left side of the backpack is shown here where some supplies are strapped in, while others are sitting in pockets.
Tools sitting at the bottom of the bag are also thoughtfully placed because that's where they've found a home!
The hardened base of the backpack allows for tools to stand at the bottom of this backpack without much interference when on-the-go. Organization is maintained even while being thrown around during the day.

Main Compartment (Right Side)
On the right side, it's easier to see some of my supplies sitting at the hard bottom of the bag.
While this extra space may be better utilized, I've found that it's helpful to place random items that may otherwise not have had a good home.

3636 Work Pack Pro
Primary Main Compartment Pouch
This wide pouch is convenient to place mutes and tools that are easy to feel around for.
Since I can't easily see the bottom of the pouch, it's best to put only mutes or tools that have a unique shape.

Here are the pouches at the reverse side of the main compartment.
All neat and tidy!
Secondary Main Compartment Pouch

3636 Work Pack Pro
I place heavier duty tools in this compartment because the pouch is rugged, and I can see through the pouch to easier locate the tools I need.
SwissGear Laptop Backpack Pouch

Here's some sand paper that is stored quite nicely in the laptop compartment of the back pack.
Flat items can safely be stored in this part of the backpack, much like this sandpaper.
See SwissGear Backpack in Black
See SwissGear Backpack in Black & Brown
See SwissGear Backpack in Brown Canvas
^^^See the latest prices^^^

3636 Work Pack Pro
SwissGear Laptop Backpack Zipper
Here I show how this portion of the Swiss Tool Backpack can be unzipped to access tools like the sandpaper that I keep in my SwissGear Bag.

Electronic Accessory Pouch
This pouch is for battery packs so that you may charge a mobile device on-the-go.
Personally, I've never used the charging feature nor have found it more convenient than a wall outlet.

3636 Work Pack Pro
Swiss Airflow Backpack Feature
The back says "airflow" behind the shoulder straps. I don't really think this has much of an effect. The bag I have weighs about 30 lbs. So, it doesn't allow the fabric to hold in a shape where there is any meaningful ventilation there.
See SwissGear Backpack in Black
See SwissGear Backpack in Black & Brown
See SwissGear Backpack in Brown Canvas
^^^See the latest prices^^^
Is the SwissGear 3636 Work Pack Pro worth it?
I think this backpack is worth it especially considering its low price.
The only thing is... The wear and tear can affect the zippers functionality, but this comes only after heavy/repeated use.
This is the 2nd 3636 Work Pack Pro I've owned. I decided to purchase the bag twice because I was happy with it the first time.
Piano Technician Gear

Piano Technician Gear, Tools, Machinery
Best SwissGear Work Backpack Tool Bag Review
Nova Voyager DVR Dril Press Review By A Piano Technician
Best Roll Up Screwdriver Set PB Swiss Tools
Best Piano Service Supplies For Hybrid And Electronic Repair
Best Tools To Use For The Piano Life Saver Dampp Chaser System
Disclosure: Some of the links in this article may be affiliate links, which can provide compensation to me at no cost to you if you decide to purchase.