Bechstein Technicians Academy: Tonal Voicing Grand Pianos
Bechstein Technicians Academy 6/16/23 - 6/18/23
Class: Tonal Performance (Voicing grand pianos)
Notes by Danny Lootens
What is Bechstein’s Voicing Process?
10 Step Overview:
String leveling
Tuning (A445 in factory for Bechstein).
Select sample notes in each register for voicing and mark “weak” and “strong” sections in each register.
Lightly mark string grooves with graphite paper
Needle and file samples until suitable result is achieved.
Replicate samples in the rest of the scale, needling then filing.
Remedial needling and filing
Hammer mating to strings
Juicing
Final filing/ironing
1. String Leveling
It is necessary that the hammer strikes all three strings simultaneously. Checking the string level with a bubble level or by feel, and adjust the level of the strings by using a string hook.
Check by lifting the hammer to the strings and plucking each string while the damper is suspended. Listen for any inconsistency in sustain after each pluck.
2. Tuning (A445)
All Bechstein pianos are tuned at their German factory to standard pitch A4 = 445 Hz. The pianos are expected to be shipped from the factory in this condition. The high tension compensates for the considerable amount of stretching of new strings within the first year.
3. Select Samples & Mark “Strong” vs “Weak” Sections
Start by conceiving a tonal concept for the piano and how the current tone must change to fit that ideal. Somewhere on the keyboard mark "strong" and "weak" sections (five to six) for the entire scale, then choose several sample notes throughout.
Good sample notes are preferably away from plate breaks and of the same letter name. E notes are often good because they lie in the middle of mono- and bichord sections, as well as away from plate breaks. If one note in the sample set is unsuitable (either better or worse than the others), you should pick a white key in consonance with the set pitch (e.g. G or B in the case of E).
Criteria for setting samples:
White key
Preferably octaves or consonant intervals
Away from plate breaks
Middle of sections (mono-, bi-, trichord)
Medium Quality (not the worst, not the best)
With samples and weak/strong sections marked, begin with needling techniques in the following steps. In weak sections, you may skip the first step (isolating the crown).
4. Mark String Grooves with Graphite Paper
Before any voicing, lightly mark all string grooves with graphite paper. Primarily, this allows you to differentiate in-groove and between-groove needling. Secondarily, as you will be hammer filing with each round of voicing, these marks will be erased and show which hammers you've completed.
Creating Ideal Felt Density Distribution

Before introducing the next step, it is important to understand the mechanics of hammer felt and how the following techniques change that felt structurally. These techniques each have a different effect and should be used in moderation, especially on used hammers; avoid relying too much on any single technique for softening, as the techniques are meant to be used congruently to achieve the ideal density distribution within the hammer felt.
One of the visualizations used to guide the voicing of new Bechstein hammers is the idea of creating a “sandwich” of dense, soft, and dense felt. The softer (less dense) shoulders of the hammer allow the crown to “bounce,” as if the denser crown portion is floating, in a sense, on a soft cushion.

The low shoulder needs to remain hard as a back-stop during the hammer’s compression. It is also crucial to note that the middle section increases gradually in density as you approach the crown.

As you can see, the felt gradient is soft, dense, denser, and densest toward the top of the crown.
Three Main Techniques: (pictured left to right)
Crown isolation, edge of grooves, 2 rows on either side. Fewer stabs (4-5) for softer scale sections. Shallower in treble. 8mm needles, full length.
Shift Voicing (Verschiebung). Shallower needling in the treble. 4mm deep (2-3mm for softer scale sections).
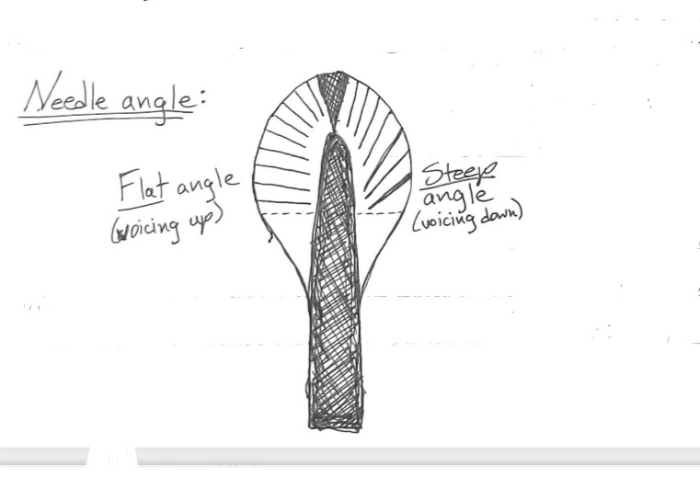
Deep shoulder needling, steep angle. Approach pure vertical angle as you move up the shoulder, as well as shallower strokes. Two arrows in sketch indicate motion of movement, as stabs are not counted but felt. Two rows used for two, 8mm needles.

5. Begin Voicing Samples
Begin voicing the sample notes, checking effect after each technique is used. If a greater effect is needed, you may repeat any step. If effect is too much (consider only after hammer file), or if you must increase density at the strike point, you may deep-needle the shoulder at a flatter angle. Before needling entire sections, hammer file each sample to demonstrate the end result for comparison.
6. Replicate Samples through rest of Scale
Once samples are acceptable, replicate in the rest of the scale, with regards to weak/strong sections.
Once initial round(s) of needling are complete, file the full scale to remove surface marks and carbon. Try to remove only one, small, even layer of felt from the hammer surface. Filing will have a brightening effect on freshly needled hammers, as it removes fuzz and can even mat the felt a bit. First file 240 grit, second file 500, final file (after later needling) 800. Final file should be the last thing, so check if more needling is needed after 500 grit cleanup.
If additional needling is required, use previous techniques and/or those described next. Know that any needling will require further filing afterwards to smooth the surface.
7. Remedial Needling and Filing
Additional Techniques (if needed)
Strike Point. Only if intense extreme hardness reduction is needed. Insert needles directly on crown, in grooves (yes, actually in the groove). Two needles should just miss center. Consider this technique a last resort for softening (only if you cannot voice the shoulders further). Flatten strike point with handle butt after needling to compact fuzz on grooves.
Restorative shoulder needling. Insert the needles deeply into the shoulder, but with a flatter angle, which restores density to crown. Needle in line with grooves, but be careful not to undermine the crown, as the needles will be penetrating deeper horizontally than in previous techniques. This technique voices “up” and should only be used if previous techniques leave tone sounding “empty.” This technique can be used to improve sustain and tone, especially in weaker sections.

8. Hammer Mating to Strings
After all needling and filing, making sure the hammers are filed square, begin mating hammers to strings. The strings should already be level from step 1, but now is a good time to check it by feel as you go along mating hammers.
*On new Bechstein grand pianos the let off rails can be removed completely, allowing you to easily block hammers for mating purposes.
9. Juicing
After mating the hammers to strings, consider using hammer hardener to liven-up the tone without reversing all the needling. This can improve attack, sustain, and core tone.
Bechstein uses two versions of the same hardener, one liquid and one thickened by allowing it to dry partially (does not crystallize or become lumpy, but thickens like syrup). The thin liquid can be applied in thin stripes (via hypo oiler) just at the ends of string grooves, front and back. The thick hardener is applied with a small artist brush in small daps, directly on the string grooves.
Strike hammer tops with metal hammer directly after each step of juicing to aid penetration and absorption. After 15 mins or so, strike hammers again to break apart and stabilize hardener particulates.
10. Final Filing & Ironing
Consider a final pass of filing and ironing to reduce fuzz, smooth the strike point, and bind the surface fibers of the felt to "lock-in" the voicing.
Ironing the hammers has a stabilizing effect because compressing the hammer under heat will remove inconsistencies in the outer felt layers (think about how an iron flattens out the fibers in clothes, more so than simply rubbing with you hands). Ironing does technically harden the felt, but unlike liquid hardener, it does so without adding weight. This additional hardening effect should be considered when finalizing the voicing.
Naturally, as with all steps in the voicingprocess, this may require the hammers to be evened out, especially using the shift pedal.
Extra - Tools

The photo above includes a sketch of the Jahn voicing tool along with a shank with a needle for single string voicing.
Bonus - Bechsteins Technicians Academy
C. Bechstein Pianos: Action Parts and Piano Parts
The Berlin Showroom for C. Bechstein Concert Grand Pianos
New Hammerheads from C. Bechstein: Piano Hammers
25 Tips on How to do Grand Damper Regulating
C. Bechstein Grand Piano Factory Tour Experience
Technician Gear, Tools, Machinery
Best SwissGear Work Backpack Tool Bag Review
Nova Voyager DVR Dril Press Review By A Piano Technician
Best Roll Up Screwdriver Set PB Swiss Tools
Best Piano Service Supplies For Hybrid And Electronic Repair
Best Tools To Use For The Piano Life Saver Dampp Chaser System